TechTip: Raspberry Pi Data Acquisition Using Universal Library for Linux®
Introduction
The Raspberry Pi® is a single-board computer that runs the Linux® kernel-based operating system and provides easy connections to peripheral devices, including a monitor, mouse, keyboard, and MCC data acquisition devices. With a cost of less than $40, the Raspberry Pi provides a cost-effective way to perform data acquisition. You can acquire data from most Measurement Computing USB DAQ devices using the Raspberry Pi and UL for Linux.
Objective
Acquire data from an MCC DAQ device using a test application installed on a Raspberry Pi computer.
This document provides information about how to perform the following tasks:
- Format an SD card
- Install an operating system onto the Raspberry Pi
- Configure Raspberry Pi options
- Install Universal Library for Linux drivers and build the library
- Run an MCC Linux test app
Intended Audience
This document is intended for application developers familiar with MCC DAQ devices who are interested in acquiring data on a Linux platform using a Raspberry Pi.
Equipment
The following equipment is needed to perform the exercises:
- Raspberry Pi single-board computer – For this example, Raspberry Pi 3 model b is used, but you can use any Raspberry Pi model
- microSD card (8 GB or higher)
- PC or Mac® with internet access
- Ethernet® cable or wireless adapter (The Pi model used here has built in WiFi)
- Monitor or television + HDMI cable
- Power supply
- Mouse or trackball
- Keyboard
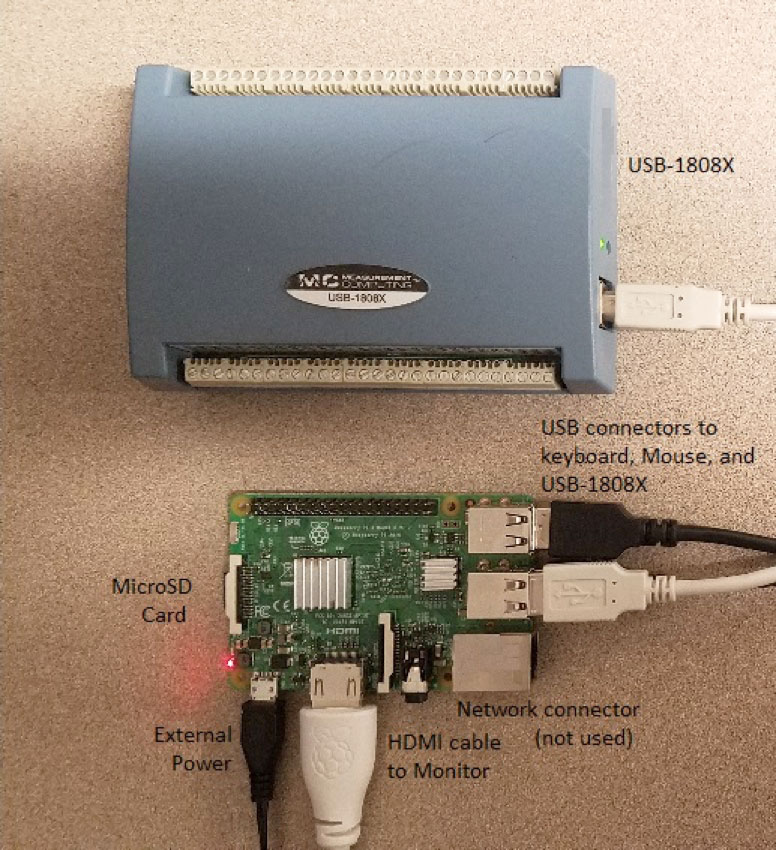
- MCC DAQ device – I'm using a USB-1808X to perform data acquisition tasks
Click here for a listing of MCC DAQ devices supported under Linux® and compatible with Raspberry Pi.
The image below shows the Raspberry Pi configuration used to perform these exercises.
Install the Raspberry Pi Operating System
You must install the Raspberry Pi operating system onto the Raspberry Pi before it can be used. The Raspberry Pi OS (previously called Raspbian) is the official supported OS for the Raspberry Pi.
Use the Raspberry Pi imager to install the Raspberry Pi OS to a microSD card. The SD card must be formatted to remove all previous information.
Watch the Video! Go to HOW TO INSTALL RASPBIAN OS to your Raspberry Pi with ease to see a brief video that shows how to image your microSD card with Raspberry Pi OS.
Format the microSD card
Perform the following steps to format the microSD card:
- Go to www.sdcard.org and click SD Memory Card Formatter button.
- Scroll to the page bottom and select the SD formatter for Windows or Mac, follow the on-screen prompts, and then save the download on the computer.
- Install the SD card into your PC or Mac and run the SD Card Formatter 5.0.1 Setup.exe (SD formatter executable).
Write the Raspberry Pi image to the microSD card
- Insert the microSD card into a computer or SD card reader connected to a computer.
- Go to https://www.raspberrypi.org/downloads/ and download the latest version of Raspberry Pi Imager specific to your operating system (Windows, macOS or Ubuntu).
- Connect an SD card reader with the formatted SD card inside.
- Run the Raspberry Pi Imager exe and select an operating system.
- Choose the SD card you wish to write your image to.
- Click 'WRITE' to begin writing data to the SD card.
For additional information and options go to the Installing operating system images page on the Raspberry Pi website.
Use the Raspberry Pi
- Insert the microSD card into the Raspberry Pi.
- Open the setup options menu and configure various options such as the language and regional settings to match your location
- Tap <Finish> and press <Enter> when done setting configuration options.
- The command prompt displays pi@raspberrypi~$
Congratulations! You have now ready to use the Raspberry Pi!
Logging In
Each time you boot up the Raspberry Pi you are prompted for the following login information:
 raspberrypi login: pi
 password: raspberry
The command prompt displays pi@raspberrypi~$
Verify Internet Access
Before downloading UL for Linux, verify that the Raspberry Pi can access the internet. You can connect an Ethernet cable or connect a USB WiFi adapter to connect with a wireless network. This example uses the Pi’s built in WiFi adapter.
- Double-click the WiFi Config icon on the desktop to start the wireless configuration program. The Adapter: field lists the name of the USB wireless adapter (for example wlan0); the Network: field is empty.
- Click Scan to list the available wireless networks.
- Double click on the service set identifier (SSID) network name to which you want to connect.
- Verify the Authentication and Encryption fields on the connection window, and enter the password in the PSK (pre-shared key) field.
- Click Add.
The configuration program automatically connects to the newly configured network.
- Cycle the device power to reboot the Raspberry Pi and enter the login information above.
After logging in, the command prompt displays pi@raspberrypi~$.
Update the Raspberry Pi Package List
To ensure that you have the latest Raspberry Pi software versions for each package installed, enter the following code from the terminal window to update the Raspberry Pi package list.
$ sudo apt-get update
UL for Linux
To build and install the latest version of the library, refer to the instructions on GitHub at: https://github.com/mccdaq/uldaq
Examples
MCC example apps are developed on Linux and are available for Linux supported MCC devices in C and Python. The example apps perform all the device functions such as acquire analog, counter, and digital data (as supported), test device functionality, and display device information.
Refer to the online help for C/C++ or the online help for Python for an overview of each test/example app. Select an appropriate test app for your device.
Running Examples
Example apps are located in the examples folder. Run the following commands to execute the analog input example:
C: $./Ain
Python: $ ./a_in.py There are example apps for each feature of supported devices, for example:
| Function | C Examples | Python Examples |
|---|---|---|
| Analog In | Ain AInScan AInScanWithEvents AInScanWithQueue AInScanWithTrigger | a_in a_in_scan a_in_scan_with_events a_in_scan_with_queue a_in_scan_with_trigger |
| Analog Out | AOut AOutScan | a_out a_out_scan |
| Digital IO | Din DBitIn\ DInScan DInScanWithTrigger DOut DBitOut DOutScan | d_in d_bit_in d_in_scan d_in_scan_with_trigger d_out d_bit_out d_out_scan |
| Counter In | CIn CInScan CInScanWithEncoder | c_in c_in_scan\ c_in_scan_with_encoder |
| Timer Out | TmrPulseOut | tmr_pulse_out |
Each example performs a specific function of a supported device and is well commented for your review. Additional prompts appear if more information is needed, such as a channel number or frequency value. The examples run and the results displayed on the monitor.
More Information
Please reach out to our support team on the Digilent Forum if you have any questions: https://forum.digilent.com/
Additional TechTips are available here in Digilent Reference: App Notes, Tech Tips, and Other Documents